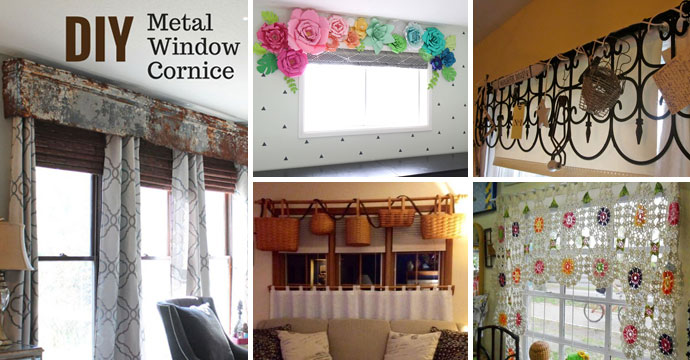
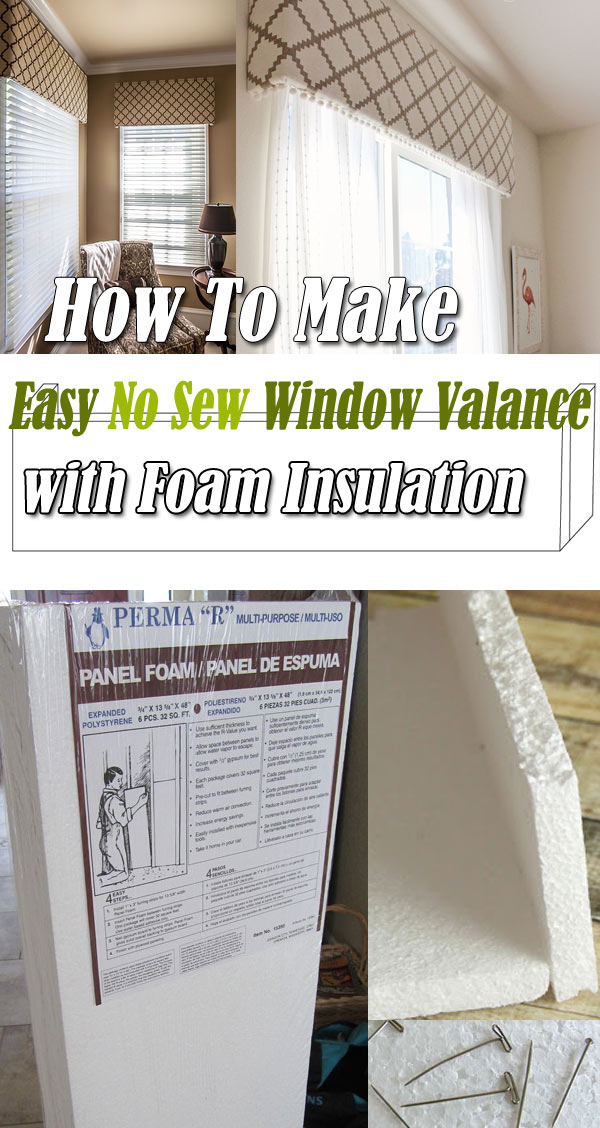
How To Make Easy No Sew Window Valance with Foam Insulation
If you think any window in your home is a bit boring, why not refresh it with a decorative Cornice Board Valance? Generally, it is hard to find an ideal style and size of a valance box in a store. Fortunately, there are a lot of DIY window valance ideas that can help you. Window valance boxes are pretty easy to DIY and can easily enhance the look of your existing curtains or a bare window. In this post, we’ll show you how to make a super budget-friendly window treatment: a No Sew window valance from foam insulation!
Supplies You Will Need:
- Foam insulation board
- Hot Glue Gun and Glue Sticks
- Pen
- Scissors
- Scrap cardboard(optional)
- Straightedge
- Utility knife
- Straight Pins or T-Pins
- Command strips(optional)
- Tape measure
- Batting
- Decorative fabric
#Step 1:
The first step is to determine what size you want your valance to be. Start by measuring the outside width of the window, including the frame or wood trim around it. To ensure that your valance covers the entire window and looks proportional, you should add at least 5 – 10″ to that width measurement. Next, you will need to determine how far out from the wall you want your valance to sit. The depth depends on the type of curtains you have. For example, blinds require less depth than fabric curtains. Finally, consider the height. A simple rule of thumb is to take the height of your window or curtains, divide that amount by 5, and take 1/5 as the height of your valance. You can also make a sample using a cardboard scrap cut to the size of the valance to test the final effect of the height.
See our another article about DIY valance ideas:
20 Very Cheap and Easy DIY Window Valance Ideas You Would Love:
#Step 2:
The next step is to transfer your measurements to the foam insulation for cutting. Some foam boards have pre-measured marks down the entire sheet, which can make your measuring and cutting work easier. If you don’t have those, you can use a straightedge to draw your cut lines. Once you’ve added the cut lines to the boards, cut them with a sharp blade or jigsaw. To avoid snapping the foam boards and to get the cleanest edges, go slow.
Tips:
- After cutting the foam insulation, the edges may be rough and uneven. Sand the edges gently with fine-grit sandpaper to create smooth and even edges.
#Step 3:
It’s time to glue up all of the pieces – the front and two sides. Attach the side pieces to the back edge along each side of the front piece. To hold them in place, you can use a hot glue gun and a few straight pins or toothpicks for support. After the glue sets, the finished piece should look like a stubby “U” shape.
#Step 4:
Next, wrap your foam box in batting (to give it an upholstered look) and fabric. Place the decorative fabric right side down and then the batting atop the fabric. Make sure your fabric and lining are large enough to cover all of the foam. Place the foam box over the batting. Fold the fabric and wrap the foam box as if wrapping a gift. Make sure the pattern is straight and use straight pins to keep the fabric taut around the box. Wrap excess fabric to the back of the boards and snip where necessary.
Tips:
- Adding trim or embellishments: If you want to add some extra decoration to your valance, you can consider adding trim or embellishments such as tassels, beads, or fringe. Simply glue them onto the fabric using hot glue or fabric glue.
- Adding a liner: If you want to block out more light or create more privacy, you can add a liner to the back of the valance. A thin lining fabric or blackout fabric can be used for this purpose.
- Making a template: If you want to make multiple valances with the same size and shape, you can create a template out of cardboard or paper to make the cutting process faster and more accurate.
- Experimenting with different fabrics: Foam insulation valances can be covered with any type of fabric, so feel free to experiment with different patterns, colors, and textures to find the perfect match for your room decor.
#Step 5:
The last step is to hang the valance box. There are two simple ways to hold it in place. One is to push a few straight pins through the side boards and into the window molding to secure the valance box in place. The other is to hang it on the wall using a single large command strip on each side due to its light weight.
In summary, making a No Sew window valance from foam insulation is an easy and budget-friendly DIY project that can add a decorative touch to any window. With just a few measurements and some cutting and gluing, you can create a custom valance box that fits your style and budget.